Setting Up Auth Service
Preamble
If you’re building an enterprise application with SSO or a public application using third party services such as Facebook, Google, or Github, lessons from this blog post probably won’t be particularly useful. Regardless, follow along to see how we can build an authorization service.
Introduction
Basically, in this article, we’ll set up a custom OAuth2 authorization service powered by Spring Security. Ideally, this service will be backed by an LDAP or a database. However, for the purpose of this tutorial, we’ll mock several users in memory.
Setting up Eureka Service’s Configuration
In the existing config’s git:
vim auth-service.properties

### Add the below to auth-service.properties
server.port=9191

server.contextPath=/uaa
security.sessions=if_required
## End of eureka-service.properties

git add auth-service.properties
git commit -m "Add auth-service.properties"
Setting up Auth Service
-
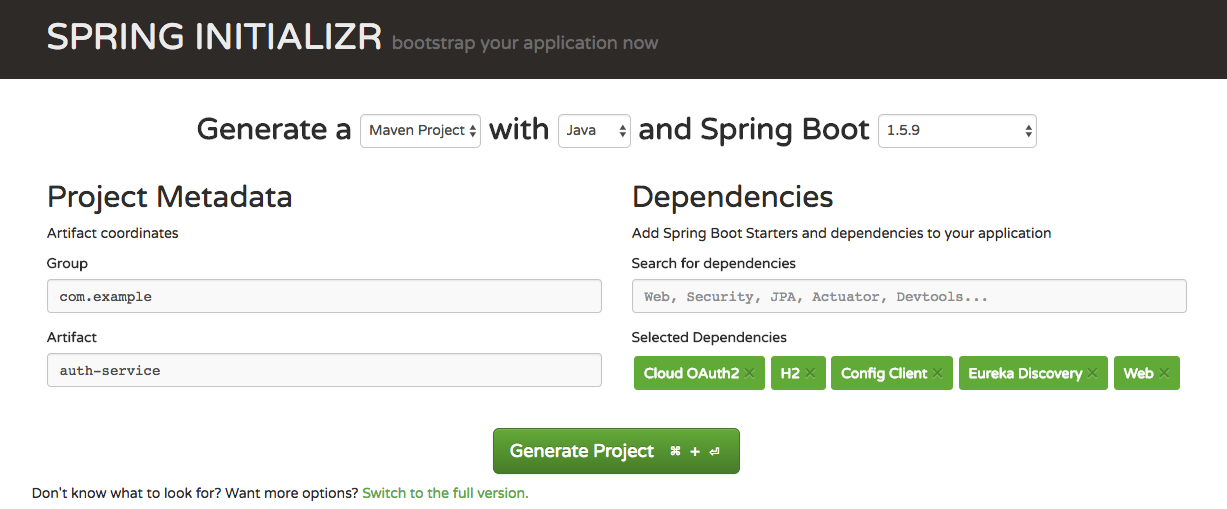
Go to https://start.spring.io/
-
Type
auth-serviceas the “Artifact” name, addCloud OAuth2,H2,Config Client,Eureka Discovery,Web,JPAdependencies, and “Generate Project”:
NOTE:
- As stated in the previous post,
Config Clientis to connect to ourconfig-serviceto get all the necessary config. - the reason we need
Eureka Discoveryis such that we can register our service to our previously set upeureka-service. - We will store our mock user accounts in an embedded
H2database and easily useJPAas an ORM tool.
- As stated in the previous post,
-
Open the project in your favorite Java IDE (mine is IntelliJ)
-
Add
@EnableResourceServer&@EnableDiscoveryClientinsrc/main/java/AuthServiceApplication:package com.example.authservice; import org.springframework.boot.SpringApplication; import org.springframework.boot.autoconfigure.SpringBootApplication; import org.springframework.cloud.client.discovery.EnableDiscoveryClient; import org.springframework.security.oauth2.config.annotation.web.configuration.EnableResourceServer; @SpringBootApplication @EnableDiscoveryClient @EnableResourceServer public class AuthServiceApplication { public static void main(String[] args) { SpringApplication.run(AuthServiceApplication.class, args); } }NOTE:
@EnableDiscoveryClientis added to register our spring boot application to oureureka-service.@EnableResourceServeris to enable Spring Security filter that authenticates requests via an incoming OAuth2 token.
-
Create a new
@RestControllerclass calledPrincipalRestControllerwith the below contents:package com.example.authservice; import org.springframework.web.bind.annotation.RequestMapping; import org.springframework.web.bind.annotation.RestController; import java.security.Principal; // The Restful endpoint people can use to convert token to user details @RestController public class PrincipalRestController { //Spring security will "inject" p with the current authenticated user provided a valid token @RequestMapping("user") Principal principal(Principal p ) { return p; } } -
Create a simple JPA
@Entityto host our mocked users, we can name itAccount:package com.example.authservice; import javax.persistence.Entity; import javax.persistence.GeneratedValue; import javax.persistence.Id; @Entity public class Account { @Id @GeneratedValue private Long id; private String username; private String password; private boolean active; public Account() { } public Account(String username, String password, boolean active) { this.username = username; this.password = password; this.active = active; } // Getters & Setters omitted for brevity sake } -
Create a corresponding
JPARepositoryfor the above entity, name itAccountRepository:package com.example.authservice; import org.springframework.data.jpa.repository.JpaRepository; import java.util.Optional; public interface AccountRepository extends JpaRepository<Account,Long>{ Optional<Account> findByUsername(String username); }There are plenty of good Spring Data and JPA tutorial out there. Nonetheless, to sum up, creating the above interface will tell Spring to provide the usual CRUD operations implementations.
findByUsernameis a custom query which Spring data will parse (and subsequently provide the implementation) by looking at its method signature. -
Create an implementation of
UserDetailsService, name itAccountUserDetailsService:package com.example.authservice; import org.springframework.beans.factory.annotation.Autowired; import org.springframework.security.core.authority.AuthorityUtils; import org.springframework.security.core.userdetails.User; import org.springframework.security.core.userdetails.UserDetails; import org.springframework.security.core.userdetails.UserDetailsService; import org.springframework.security.core.userdetails.UsernameNotFoundException; import org.springframework.stereotype.Service; @Service public class AccountUserDetailsService implements UserDetailsService { private AccountRepository accountRepository; @Autowired public AccountUserDetailsService(AccountRepository accountRepository) { this.accountRepository = accountRepository; } @Override public UserDetails loadUserByUsername(String userName) throws UsernameNotFoundException { return accountRepository.findByUsername(userName) .map(account -> new User(account.getUsername(),account.getPassword(), account.isActive(), account.isActive(), account.isActive(), account.isActive(), AuthorityUtils.createAuthorityList("ROLE_ADMIN","ROLE_USER"))) .orElseThrow(() -> new UsernameNotFoundException("could not find :" + userName)); } }Useful SO question about
UserDetailsService: https://stackoverflow.com/questions/26297490/spring-security-and-userdetailsservice -
Extend the default
AuthorizationServerConfigurerAdapter, name itOAuthConfiguration:package com.example.authservice; import org.springframework.beans.factory.annotation.Autowired; import org.springframework.context.annotation.Configuration; import org.springframework.security.authentication.AuthenticationManager; import org.springframework.security.oauth2.config.annotation.configurers.ClientDetailsServiceConfigurer; import org.springframework.security.oauth2.config.annotation.web.configuration.AuthorizationServerConfigurerAdapter; import org.springframework.security.oauth2.config.annotation.web.configuration.EnableAuthorizationServer; import org.springframework.security.oauth2.config.annotation.web.configurers.AuthorizationServerEndpointsConfigurer; @Configuration @EnableAuthorizationServer public class OAuthConfiguration extends AuthorizationServerConfigurerAdapter { private AuthenticationManager authenticationManager; @Autowired public OAuthConfiguration(AuthenticationManager authenticationManager) { this.authenticationManager = authenticationManager; } @Override public void configure(ClientDetailsServiceConfigurer clients) throws Exception { clients.inMemory() .withClient("android") .secret("secret") .scopes("openid","read","write-to-your-wall") .authorizedGrantTypes("password"); } @Override public void configure(AuthorizationServerEndpointsConfigurer endpoints) throws Exception { endpoints.authenticationManager(authenticationManager); } }If you’re unclear about OAuth2, this blog post is a good introduction about it: http://sivatechlab.com/secure-rest-api-using-spring-security-oauth2/
-
Finally, create a
@Componentwhich implementsCommandLineRunnerto pre-populate our in-memory database on startup:package com.example.authservice; import org.springframework.beans.factory.annotation.Autowired; import org.springframework.boot.CommandLineRunner; import java.util.stream.Stream; @Component public class SampleDataClr implements CommandLineRunner{ private AccountRepository accountRepository; @Autowired public SampleDataClr(AccountRepository accountRepository) { this.accountRepository = accountRepository; } @Override public void run(String... strings) throws Exception { Stream.of("tomy,spring") .map(x -> x.split(",")) .forEach(tuple -> accountRepository.save(new Account(tuple[0],tuple[1],true))); } } -
Almost there, in
src/main/resources, create a new file calledbootstrap.properties, add the below:# tell config service what is the name of the service and corresponding config to retrieve spring.application.name=auth-service # tell the location the location of config server spring.cloud.config.uri=http://localhost:8888 -
Run
AuthServiceApplicationand voila! Your Authorization server is started! (This assumes you’ve started the other 2 dependent services in the previous blog posts) -
You should be able now get your access token via the below:
curl -X POST -vu android:secret http://localhost:9191/uaa/oauth/token -H "Accept: application/json" -d "password=spring&username=tomy&grant_type=password&scope=openid&client_secret=secret&client_id=android"it should return something like:
{"access_token":"914ef762-85c8-4ef5-8aa7-b351dd23d2e1","token_type":"bearer","expires_in":43199,"scope":"openid"}We don’t need the access token right now, but hang in there, it will come in handy in the subsequent blog posts.
Conclusion:
The steps to set up the authorization service is indeed much longer than the previous services. But hey! who said security is ever going to be easy? Isn’t security the biggest enemy of convenience? :P