Setting Up Hystrix Dashboard
Introduction
Failure is inevitable. It’s even more so in distributed systems. As services communicate remotely to each other, failure points/ surface area exponentially increase. Ergo, designing for fault tolerance is a top priority when building microservices.
Hystrix is a library developed by Netflix which can help us build a more resilient system. One architecture pattern we’ll borrow from Hystrix is called “Circuit Breaker” pattern. Just like the normal household circuit breaker, microservices’ circuit breaker identifies fault in our system and fallback to a default implementation. In this post, we’ll only set up the dashboard to monitor our circuit breakers. The implementation of the actual circuit breaker will be discussed in subsequent post.
Setting up Hystrix Dashboard’s Configuration
In the existing config’s git:
vim hystrix-dashboard.properties

### Add the below to hystrix-dashboard.properties
server.port=${PORT:8010}
## End of hystrix-dashboard.properties

git add hystrix-dashboard.properties
git commit -m "Add hystrix-dashboard.properties"
Setting up Hystrix Dashboard
-
Go to https://start.spring.io/
-
Type
hystrix-dashboardas the “Artifact” name, addEureka Discovery,Config Client, andHystrix Dashboarddependencies, and “Generate Project”: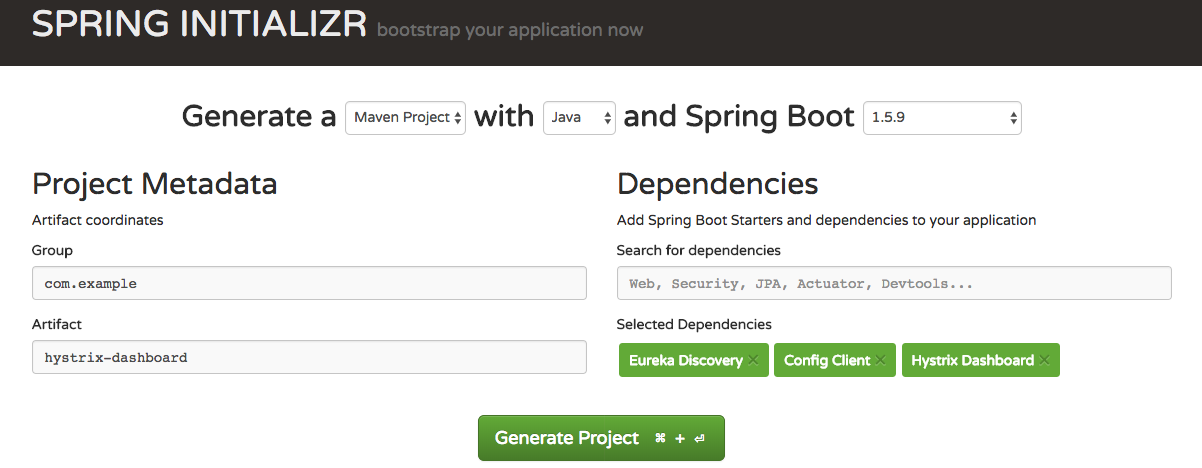
-
Open the project in your favorite Java IDE (mine is IntelliJ)
-
Add
@EnableHystrixDashboardinsrc/main/java/HystrixDashboardApplication:package com.example.hystrixdashboard; import org.springframework.boot.SpringApplication; import org.springframework.boot.autoconfigure.SpringBootApplication; import org.springframework.cloud.netflix.hystrix.dashboard.EnableHystrixDashboard; @SpringBootApplication @EnableHystrixDashboard public class HystrixDashboardApplication { public static void main(String[] args) { SpringApplication.run(HystrixDashboardApplication.class, args); } } -
in
src/main/resources, create a new file calledbootstrap.properties, add the below:# tell config service what is the name of the service and corresponding config to retrieve spring.application.name=hystrix-dashboard # tell the location the location of config server spring.cloud.config.uri=http://localhost:8888 -
Run
HystrixDashboardApplicationand voila! Your Hystrix Dashboard is started! -
Go to http://localhost:8010/hystrix.html to visit our Hystrix Dashboard. There is currently nothing, but soon, we’ll register our circuit breaker in the next posts and be able to see our circuit breakers in action.

Conclusion:
We have now set up our Hystrix Dashboard service which can visually show our system’s fault tolerance/ resiliency. In the next posts, you will see how we can use Hystrix’s circuit breaker to feed the stream of data to be visualized by this dashboard.
Next Up
Setting Up Reservation Service